It looked so pretty I thought of trying out something similar. The steps seemed simple so I went ahead. First a look at the finished nails.
Now for the steps - I started with a small sponge piece. The sponge was only big enough to cover my thumb. I like having control over the thing I am holding so I made sure it wasn't too big. Next I took white nail paint and put some on the sponge using the nail paint brush.
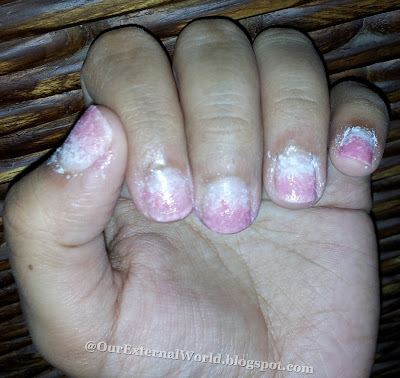
Then I gently sponged it all over my nails. To cover all fingers of one hand I had to apply nail paint twice to the sponge. The more depth of color you need the more sponging you will have to do. Also if you use a sponge with very fine holes then the look of the paint on your nails will be denser.
As you can see in the picture above I did not care about the extra paint going outside my nails. That can be cleaned off later.
Once the white color dryed (which was very quick due to low density of paint) I repeated the process with a pink colored nail paint (lotus cozy mulberry). This time I started sponging a little downwards from the nail bed - this makes the white visible as you can see in the picture below.
The final step was to use a darker shade of pink (Lakme 9 to 5 ) This was sponged only on the tips of the nails. I used a Q-tip - dipped it in nail polish remover and cleaned the sides of the nails with it.
Then I gave the complete nails a layer of top coat. When it dried out I used my stamping kit to stamp on snowflake like flowers to alternate nails starting with the thumb. I finished off by putting random dots using a toothpick. Stamping and dots were done using the same white nail paint that I used for sponging.
A final layer of top coat and I was done.
Nail paints used:
1. Lotus Herbals Color Dew Pure White (81)
2. Lotus Herbals Color Dew Cozy Mulberry (94)
3. Lakme 9 to 5 Lavender lush
4. Top coat - Lakme clear glass
I hope you like the above step by step description for this very easy method. I know a lot of you out there are experts at this technique - please do give suggestions on how to I can improve this next time onwards.


wow this is beautiful !
ReplyDeletehi.. i m new to ur blog... nicely done..http://crazypolishes.blogspot.in/
ReplyDeletethanks Dimpal
ReplyDeleteSo so pretty! I'm going to try it tomorrow! :D
ReplyDeletehttp://everythingstylishmumbai.blogspot.in/
Thanks Everything Stylish! Do let me know how it goes for you?
ReplyDeletevery prettyyyy shilpa....nice post...i m yet to try this..
ReplyDeletehttp://megaliving.net/
thanks
Deleteplease do join my blog!
Deletenice tute Shilpa :)
ReplyDeletethanks Pooja
Delete